Support
How do I set up MIDI triggering in my Cableguys plugin?
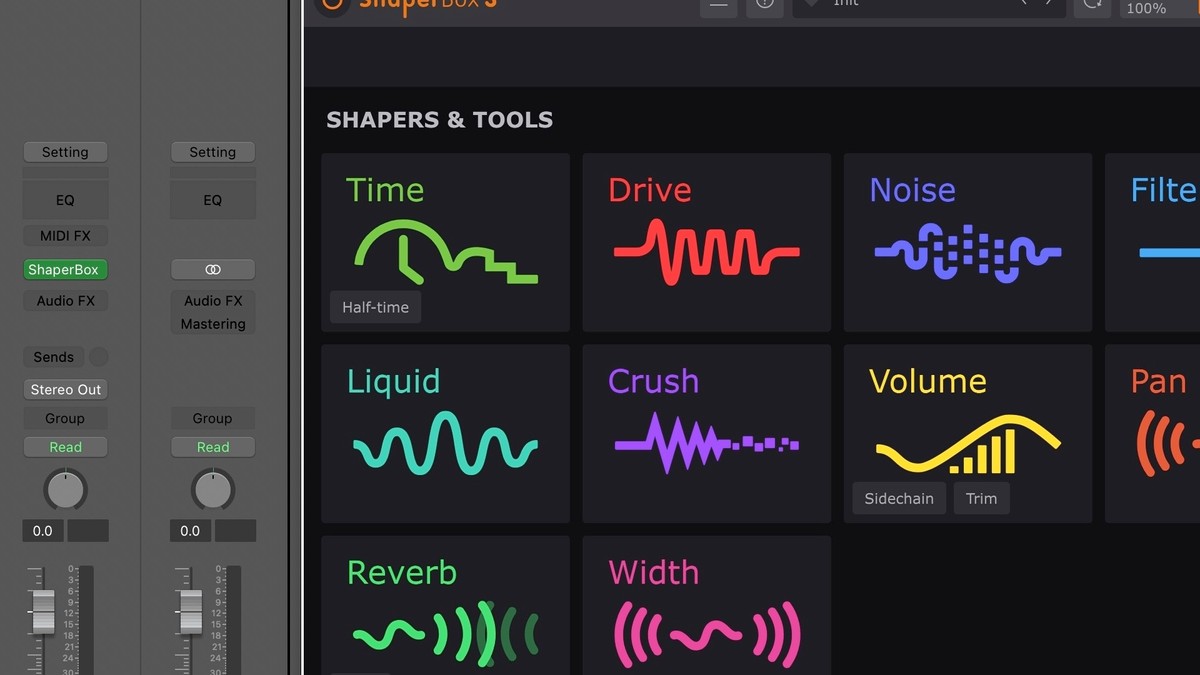
These guides show you how to use MIDI notes to trigger LFOs in ShaperBox, FilterShaper XL, MidiShaper and PanCake 2, as well as samples in Snapback.
When this technique is used, the LFO will play from the beginning every time a MIDI note is received. Thus, the LFO can be triggered in any rhythm you like – sidechain your bassline to a non-4/4 kick drum pattern, for example.
Ableton Live
MIDI triggering is especially useful in Ableton Live, because it overcomes timing problems that can arise in Live when using latency-inducing plugins.
METHOD A: One MIDI track triggering one Cableguys plugin
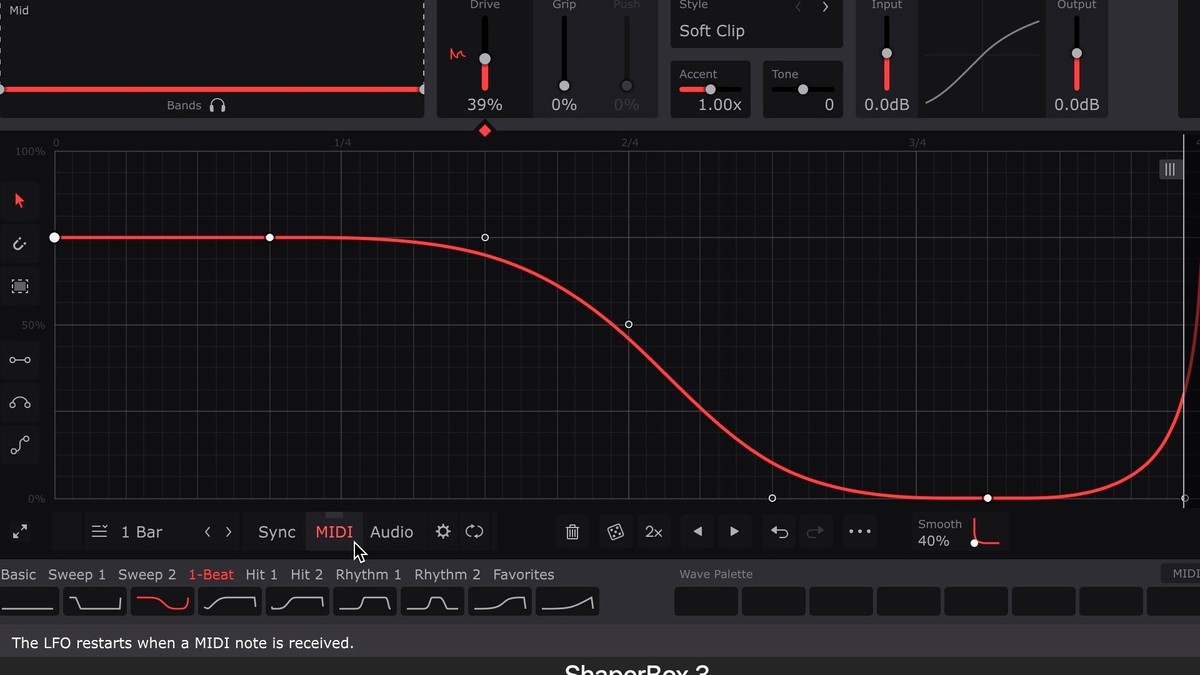
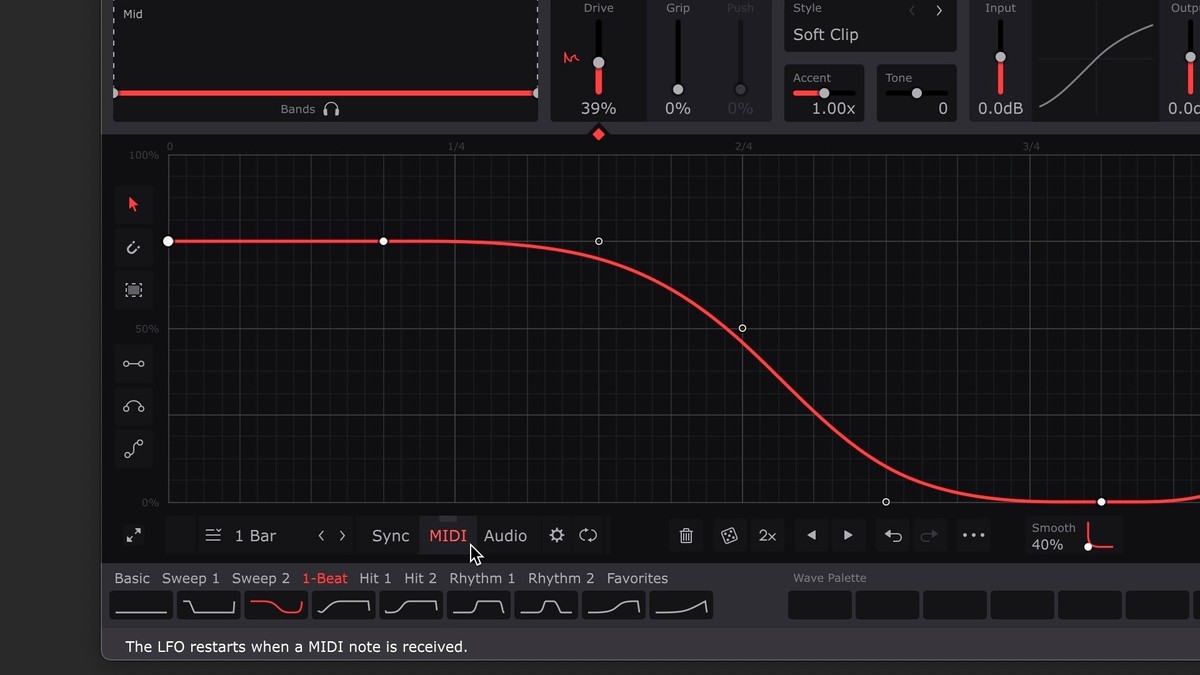
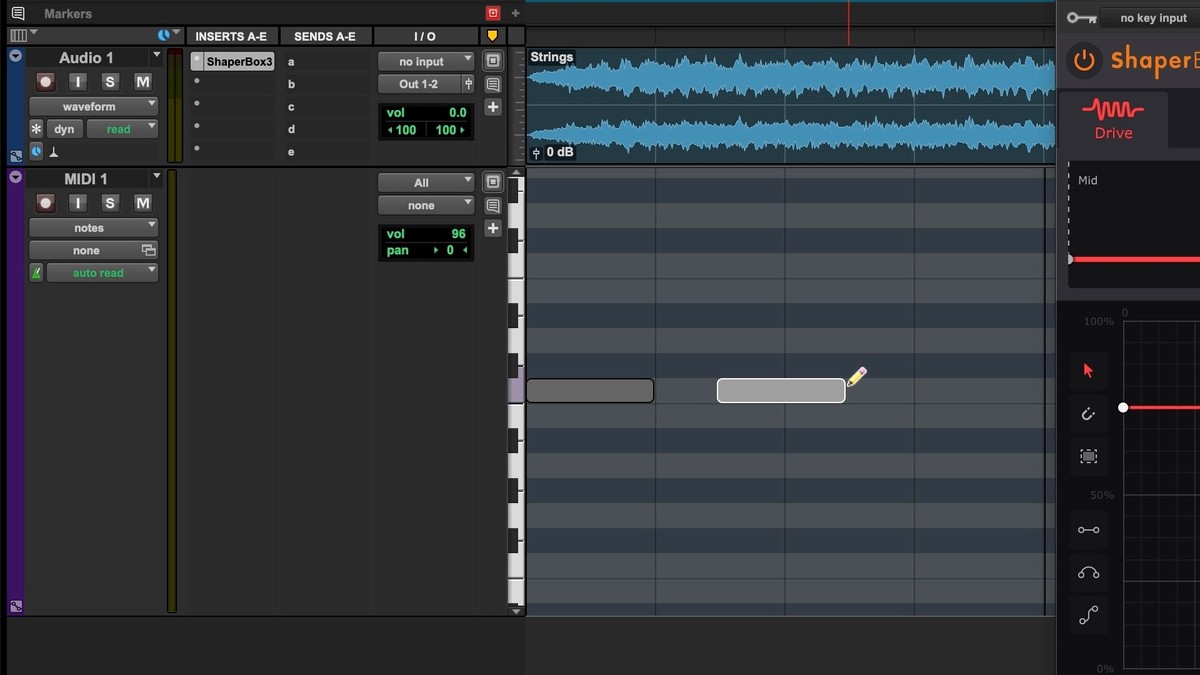
- In ShaperBox 3, FilterShaper XL and MidiShaper, turn on MIDI Trigger mode by clicking the MIDI button below the Wave Editor or in MidiShaper’s Source A, B, C or D section. In Snapback, select the MIDI option in the Trigger panel. In PanCake, select a 'MIDI Triggered' or 'MIDI 1-Shot' triggering mode. In ShaperBox 2, set the 'MIDI Trigger' mode to 'On' or 'On (1-shot)'.
Note: If you are a Mac user, use the VST or VST 3 version of the Cableguys plugin and not the AU version, as AU plugins cannot accept MIDI input.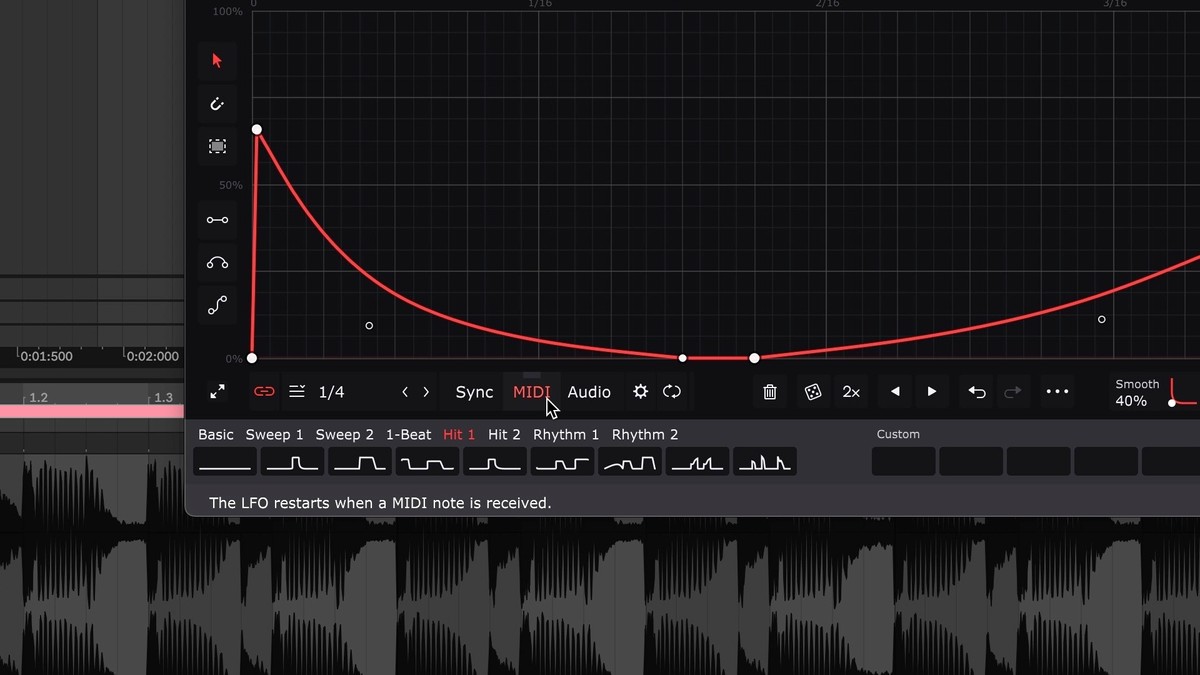
- On a new MIDI Track, create a MIDI clip and add MIDI notes in the rhythm that you want to trigger the Cableguys plugin.
Any note will work, except when ShaperBox's Wave-switching MIDI Trigger option is enabled, in which case only C notes will trigger the LFO.
Note: The MIDI track must not host any instrument or effects plugins, or it will output an audio signal rather than MIDI.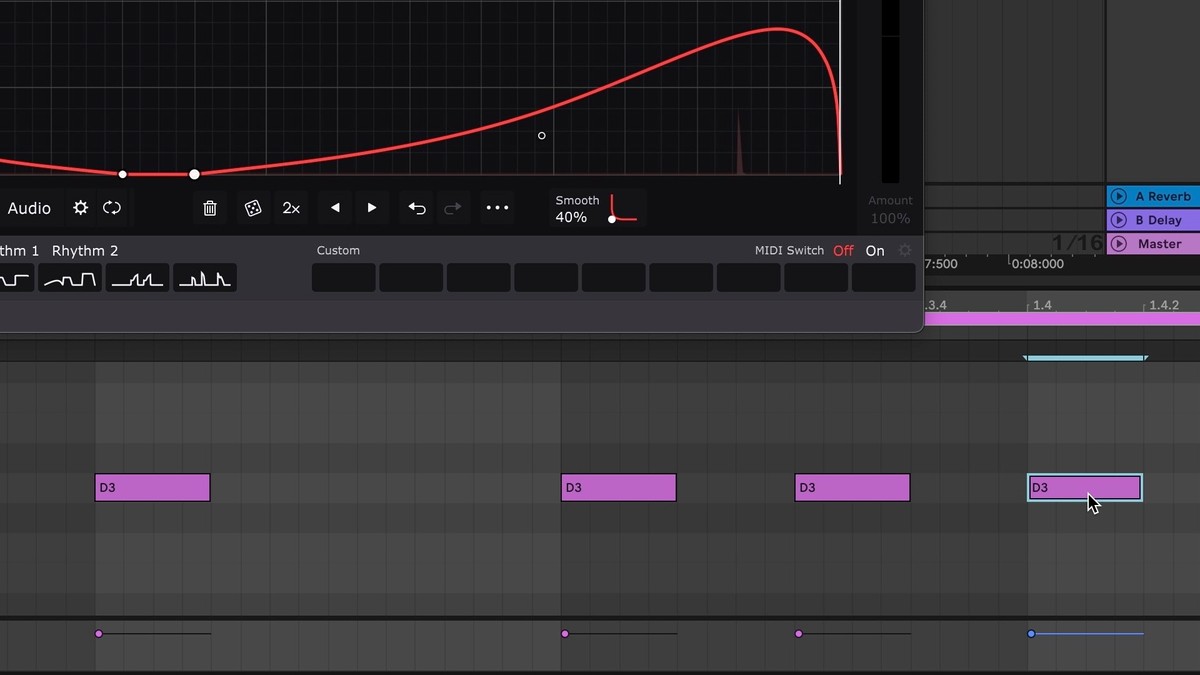
- On the MIDI track, set the upper Output slot to the track containing the Cableguys plugin. In the lower Output slot, select the Cableguys plugin if it isn’t already.
Now the Wave envelope/LFO will play from the beginning with each incoming MIDI note. Please see the manual for your Cableguys plugin for more on MIDI triggering.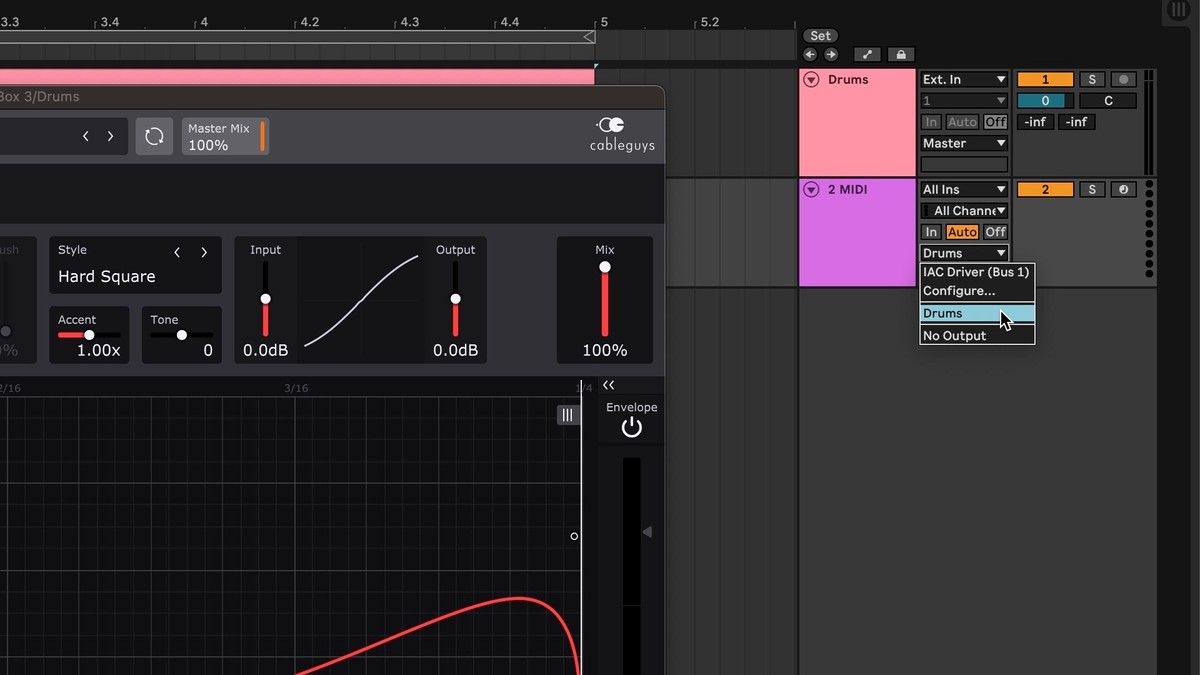
- To dual-purpose an existing synth, drum machine or other instrument track as your MIDI trigger, right-click the instrument in the Details View and select 'Group' (or select it and press Cmd/Ctrl+G) to create an Instrument Rack, then add an External Instrument Device to the Rack and set its 'MIDI To' menu to the Cableguys plugin in question.
Now the MIDI notes on the track will trigger both the instrument and the Cableguys plugin.


METHOD B: One MIDI track triggering multiple Cableguys plugins
You can use a single MIDI track to trigger any number of instances of ShaperBox, FilterShaper XL, MidiShaper, Snapback and/or PanCake within Ableton Live, using Live's External Instrument device. Here's how it's done:
- Load an External Instrument device from the Instruments section of the Live library onto a MIDI track, then right-click it in the Details View and select 'Group', or select it and press Cmd/Ctrl+G. The External Instrument should now be contained within a Group on the MIDI track.
- Set up a Cableguys plugin on any track in your project, and activate MIDI Trigger mode, as described above.
- Program your triggering MIDI pattern on the External Instrument MIDI track, then set the 'MIDI To' field of the External Instrument device to the track with the Cableguys plugin inserted. If the Cableguys plugin isn't the only MIDI-receptive plugin on the track, select it in the menu below. On playback, the MIDI clip will trigger the Cableguys plugin.
- Drag another External Instrument device into the Chain List of the Group on the MIDI trigger track to create a second Chain within the Group, then set up another Cableguys plugin on another track, again with MIDI Trigger mode activated.
- Route the second External Instrument device to the second Cableguys plugin as described in step 3. Both Cableguys plugins should now respond to the MIDI clip on the triggering MIDI track. Repeat as many times as required, with a separate External Instrument plugin routed to each Cableguys plugin in your project.
Download an Ableton Live project demonstrating this technique: Cableguys-MIDI-Sidechain-Routing-Demo.zip
Apple Logic Pro
METHOD A: MIDI-controlled AU plugin
This method works with ShaperBox, FilterShaper XL and Snapback. We recommend it over Method B, as it gives the most accurate timing and is easier to set up.
- Add a new track (⌥⌘N), choosing 'Software Instrument'.
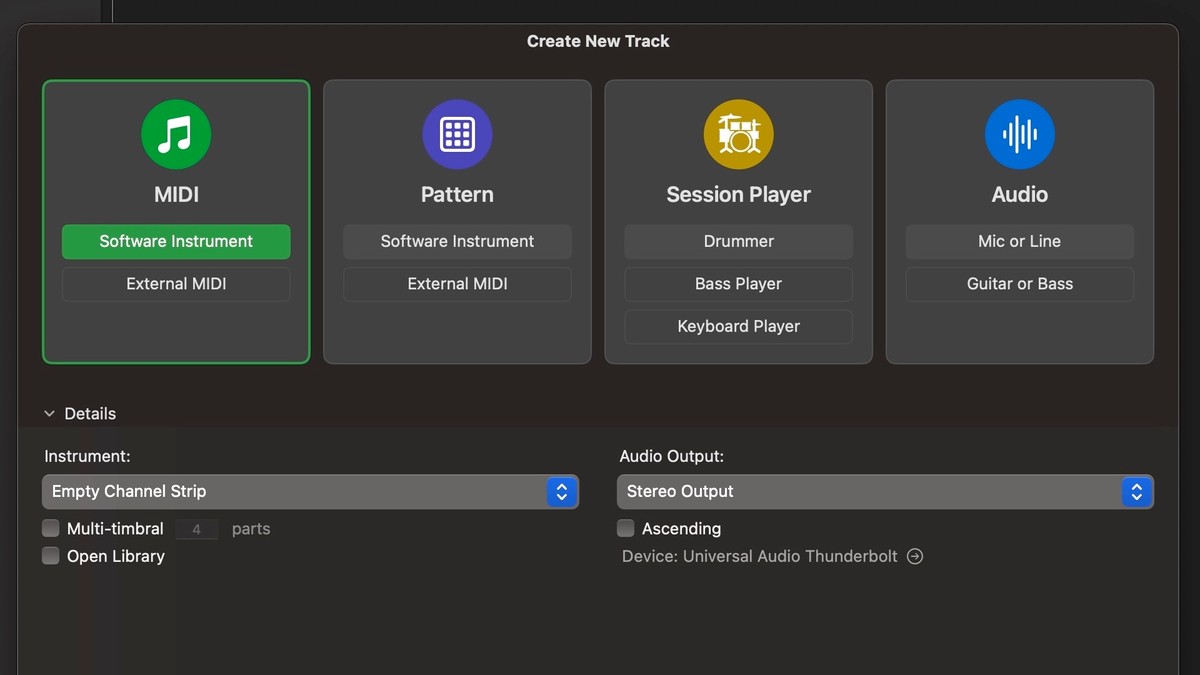
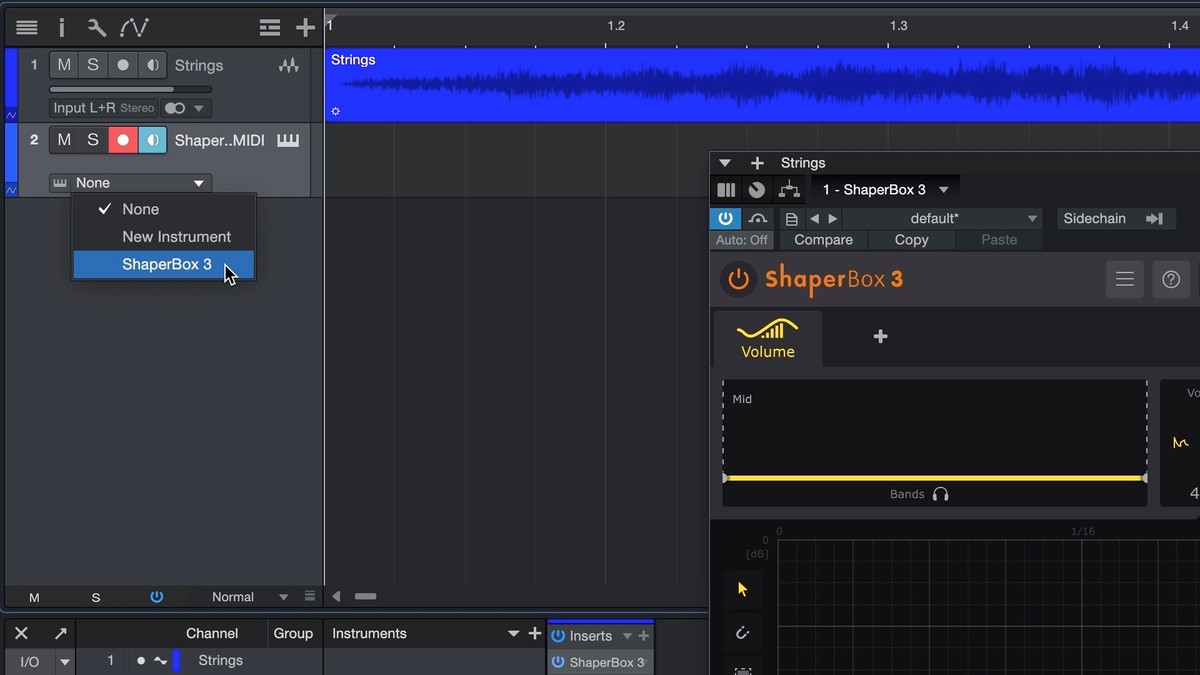
- On the Software Instrument track, replace the instrument (E-Piano by default) with the Cableguys plugin, found in the AU MIDI-controlled Effects sub-menu.
- In ShaperBox 3, FilterShaper XL and MidiShaper, turn on MIDI Trigger mode by clicking the MIDI button below the Wave Editor or in MidiShaper’s Source A, B, C or D section. In Snapback, select the MIDI option in the Trigger panel. In PanCake, select a 'MIDI Triggered' or 'MIDI 1-Shot' triggering mode. In ShaperBox 2, set the 'MIDI Trigger' mode to 'On' or 'On (1-shot)'.

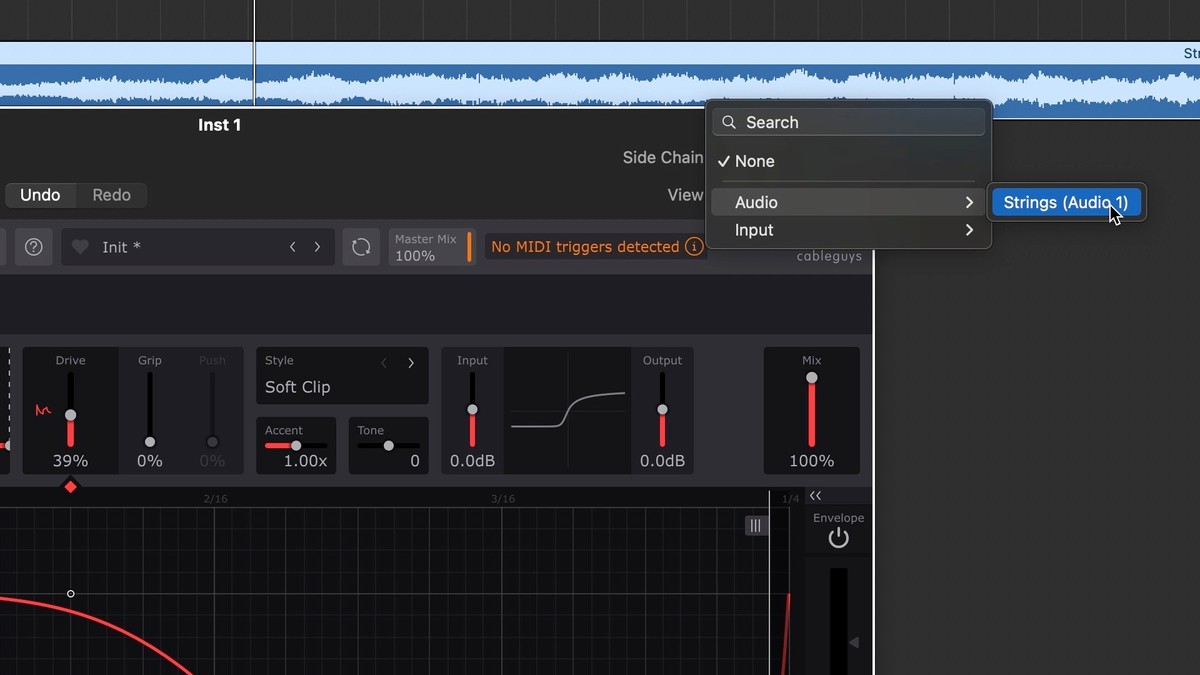
- In the top-right of the plugin window, select the track you want to process as the 'Side Chain' input.
- On the instrument track, create a MIDI clip, then draw or record MIDI notes in the rhythm with which you want to trigger the Cableguys plugin.
Any note will work, except when ShaperBox's Wave-switching MIDI Trigger option is enabled, in which case only C notes will retrigger the LFO Wave.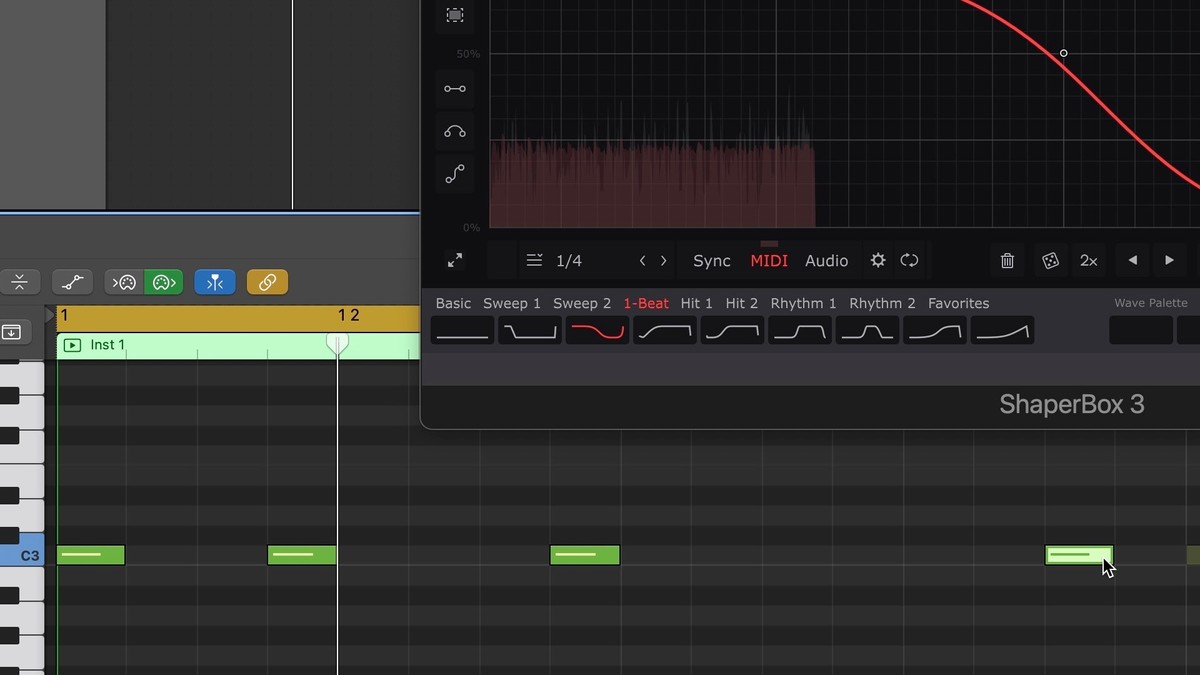
- Mute the original source track (or set its Volume to 0, or Output to 'No Output'), so that you only hear the output of the plugin.


METHOD B: IAC Virtual MIDI port
Virtual MIDI ports enable you to send MIDI between applications in macOS. You can even send MIDI back into the same application, as we will here to trigger audio plugins via MIDI in Logic.
- Open the Audio MIDI Setup application, which you can find in the Applications/Utilities folder, or by doing a Spotlight search (⌘-Space) for 'audio midi setup'.
In the Window menu, select 'Show MIDI Window', double-click the IAC Driver and make sure 'Device is online' is checked.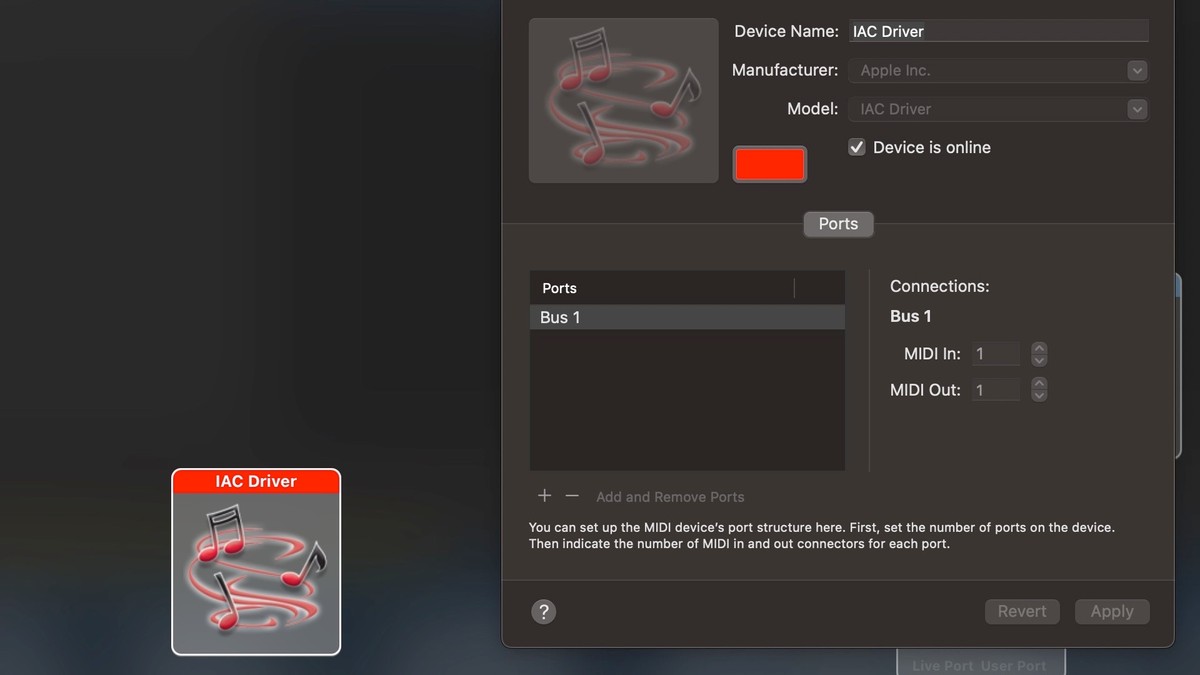
- In ShaperBox 3, FilterShaper XL and MIdiShaper turn on MIDI Trigger mode by clicking the MIDI button below the Wave Editor or in MidiShaper’s Source A, B, C or D section. In Snapback, select the MIDI option in the Trigger panel. In PanCake, select a 'MIDI Triggered' or 'MIDI 1-Shot' triggering mode. In ShaperBox 2, set the 'MIDI Trigger' mode to 'On' or 'On (1-shot)'.
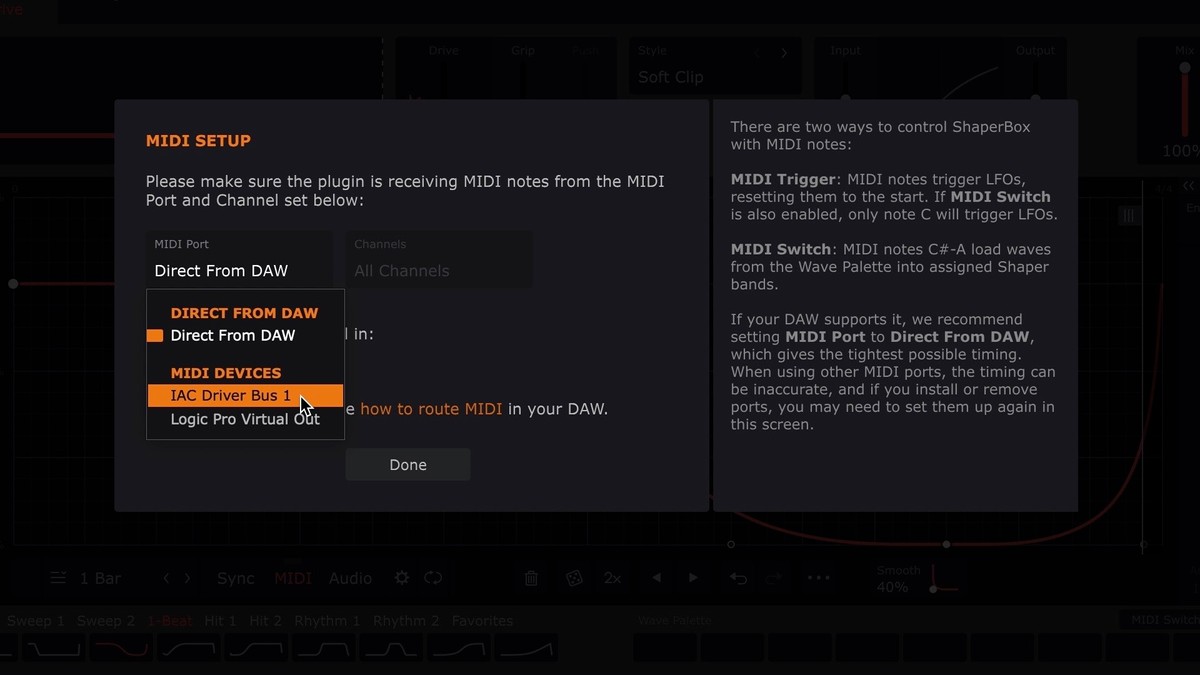
- Click the cogwheel icon to open the MIDI setup page. Set the Input to the virtual MIDI port you're using (eg, 'IAC Driver Bus 1').
- Add a new track (⌥⌘N), choosing 'External MIDI' as the track type, disabling the 'Use External Instrument plugin' option, and setting the Output to the IAC driver port (eg, 'IAC Driver Bus 1').
Make sure the track is not record enabled.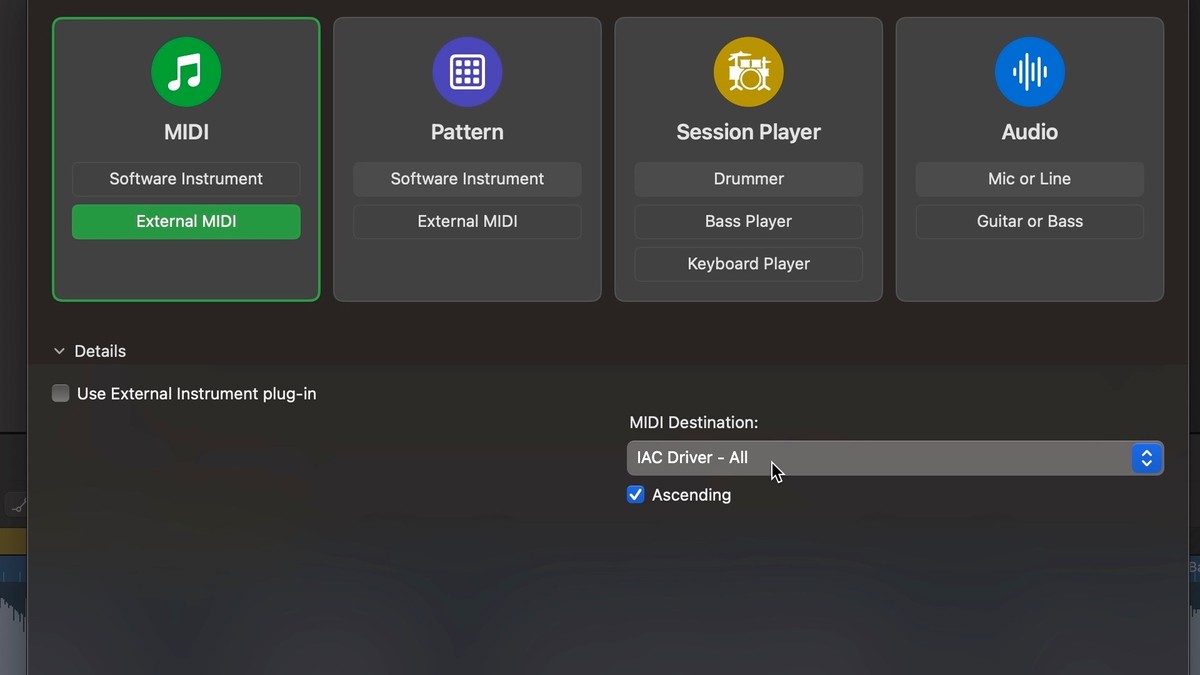
- On the External MIDI Instrument track, create a MIDI clip, and add some MIDI notes in the rhythm with which you want to trigger the Cableguys plugin.
Any note will work, except when ShaperBox or ShaperBox 2's Wave-switching MIDI Trigger option is enabled, in which case only C notes will retrigger the LFO Wave.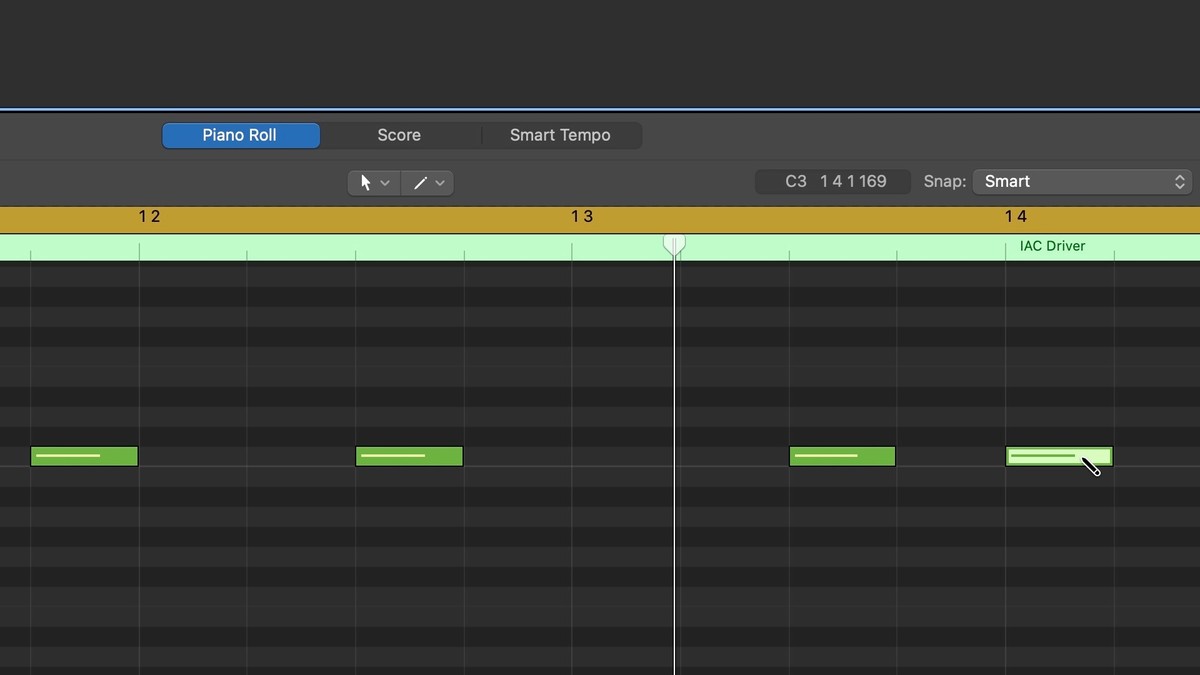
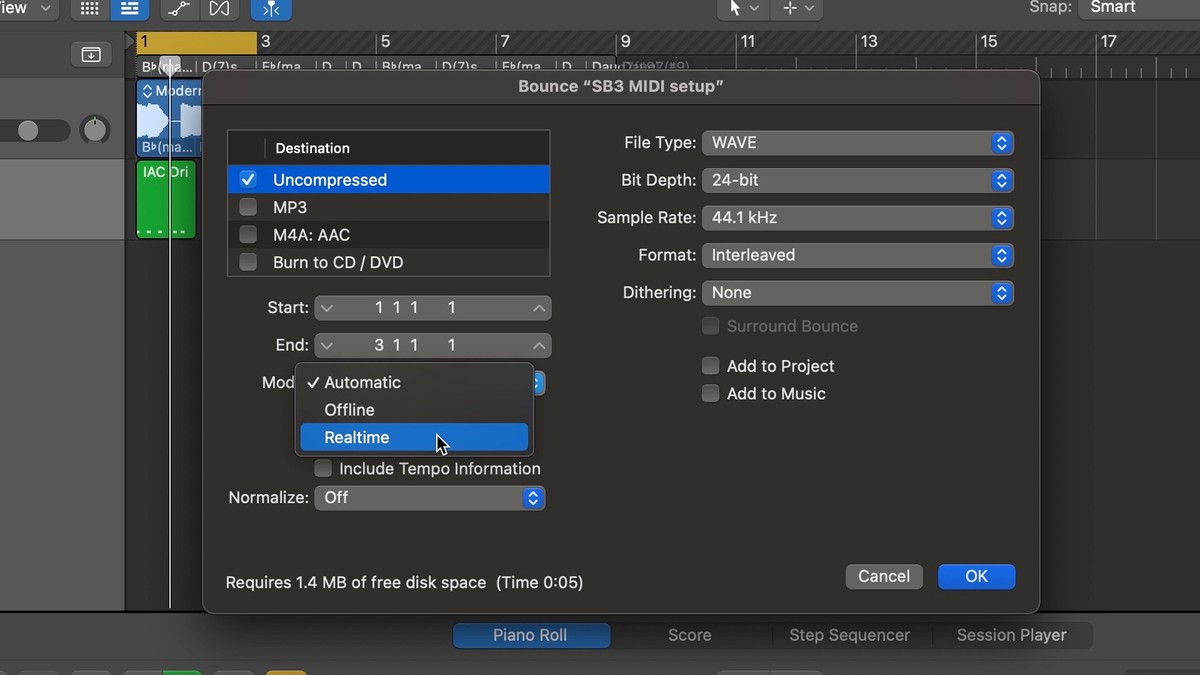
- Because the IAC virtual MIDI port routes MIDI out of and back into Logic, you must use 'Realtime bouncing' when you bounce your track. For more info, see Apple's related support page.


Avid Pro Tools
- In ShaperBox 3, FilterShaper XL and MidiShaper, turn on MIDI Trigger mode by clicking the MIDI button below the Wave Editor or in MidiShaper’s Source A, B, C or D section. In Snapback, select the MIDI option in the Trigger panel. In PanCake, select a 'MIDI Triggered' or 'MIDI 1-Shot' triggering mode. In ShaperBox 2, set the 'MIDI Trigger' mode to 'On' or 'On (1-shot)'.
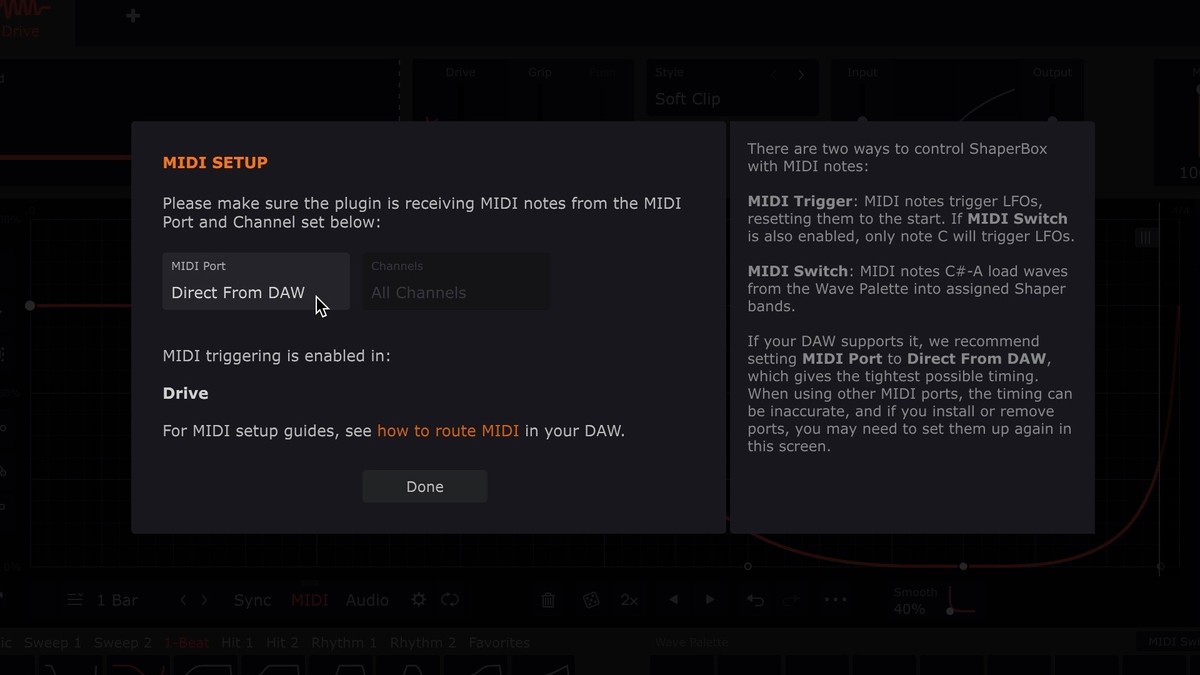
- Click the cogwheel icon to the right of the MIDI button to open the MIDI Setup page, and ensure that 'Direct From DAW' is selected in the MIDI Port field.
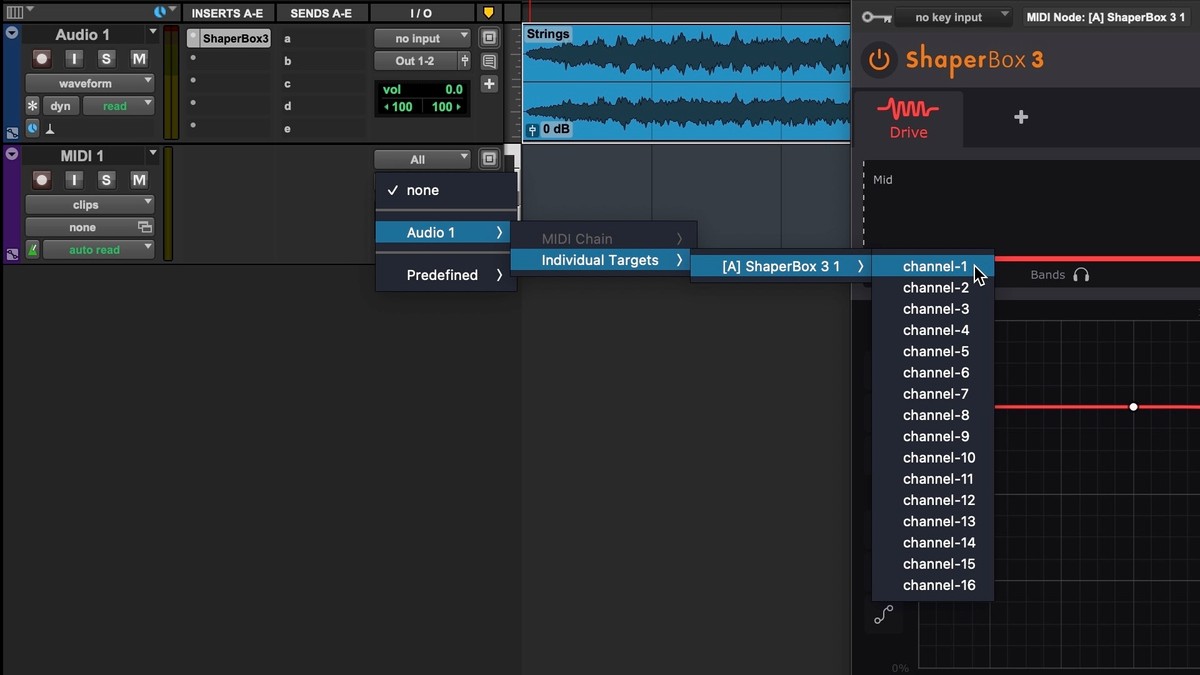
- Back in Pro Tools, create a MIDI track and, in the hierarchical Output menu, select the track hosting, for example, ShaperBox, then 'ShaperBox 3’ (or both of those options in a single entry if ShaperBox 3 is the only plugin on the track), then 'channel-1' (or whichever MIDI channel you want to use).
- Now, the LFO is triggered every time it receives a MIDI note from the MIDI track, so record or draw in MIDI notes as required. Any MIDI note will work, unless you're also using ShaperBox's MIDI Switch function, in which case only C notes in all octaves will trigger the LFO.


Cockos Reaper
- In ShaperBox 3, FilterShaper XL and MidiShaper, turn on MIDI Trigger mode by clicking the MIDI button below the Wave Editor or in MidiShaper’s Source A, B, C or D section. In Snapback, select the MIDI option in the Trigger panel. In PanCake, select a 'MIDI Triggered' or 'MIDI 1-Shot' triggering mode. In ShaperBox 2, set the 'MIDI Trigger' mode to 'On' or 'On (1-shot)'.
Note: If you are a Mac user, use the VST or VST3 version of the Cableguys plugin and not the AU version, as AU plugins cannot accept MIDI input.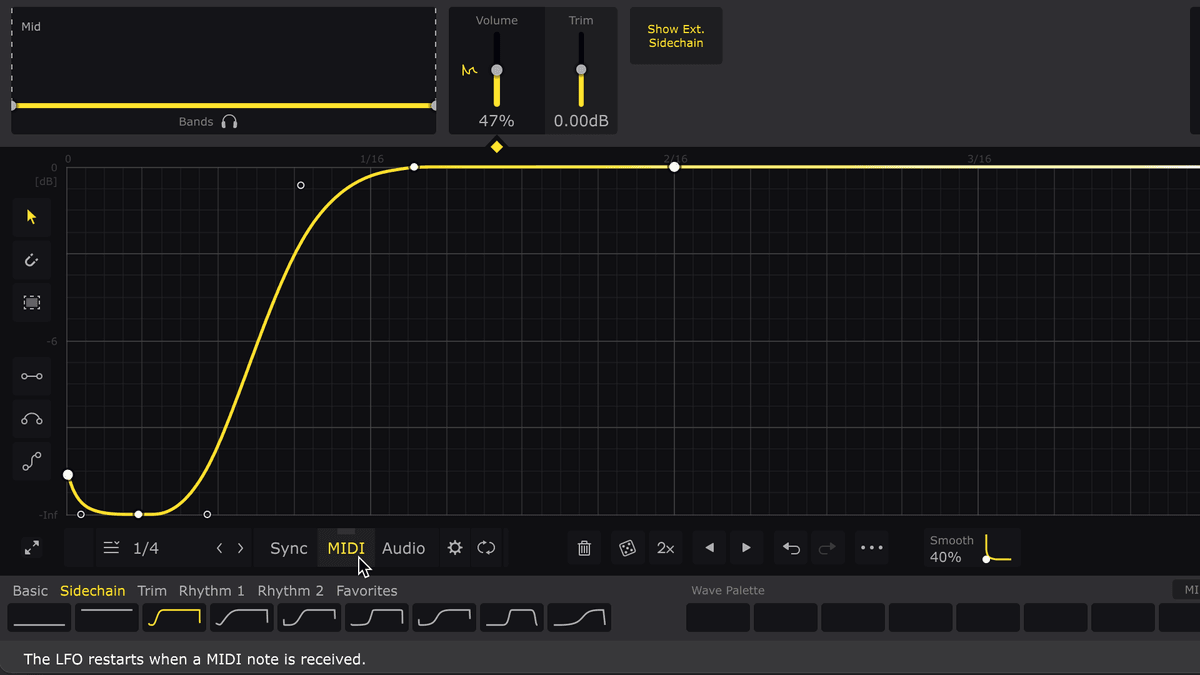
- Add another Track, create a MIDI clip, then draw or record MIDI notes in the rhythm with which you want to trigger the Cableguys plugin.
Any note will work, except when ShaperBox's MIDI Switch option is enabled, in which case only C notes will trigger the LFO Wave.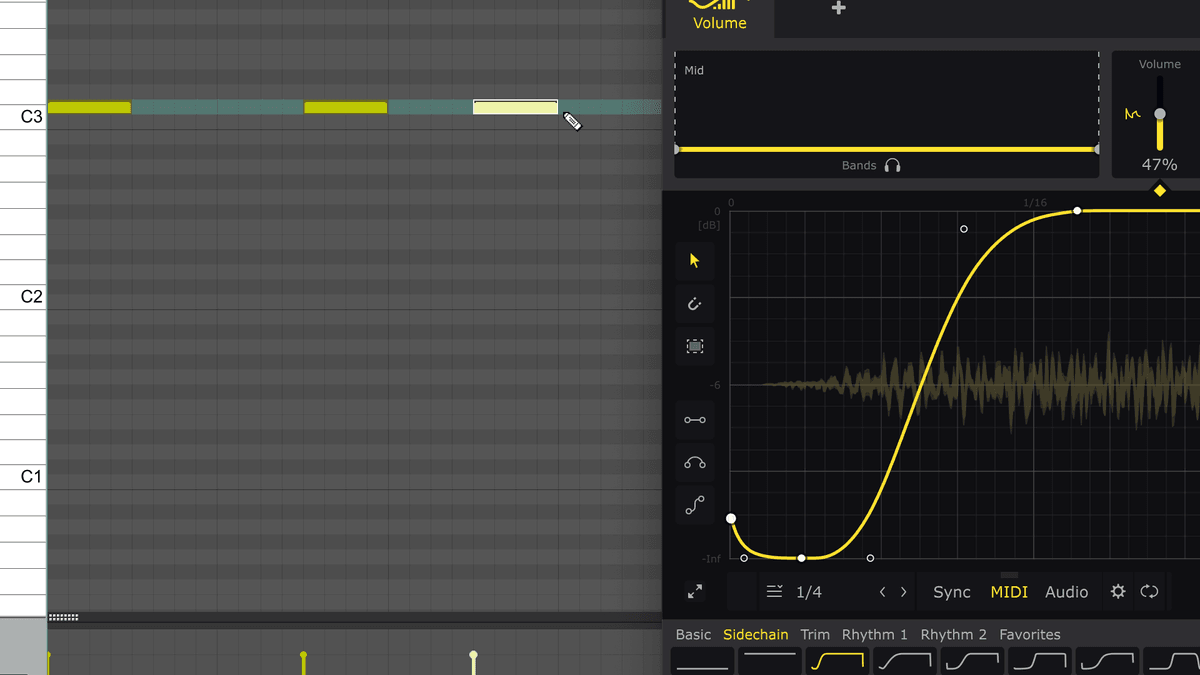
- On the track containing the MIDI clip, click the Route button, then, in the Sends section, click the dropdown that reads 'Add New Send…'. Select the track hosting the Cableguys plugin (‘Audio ‘1 in our example).
Now, the LFO will be retriggered with each incoming MIDI note.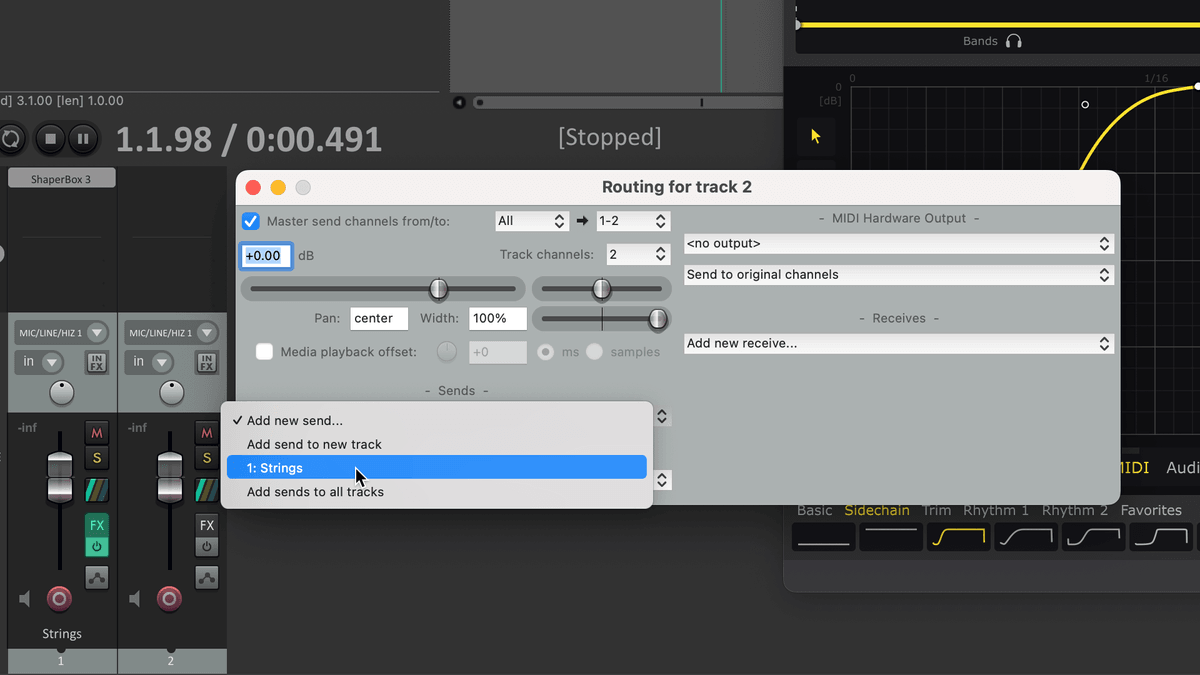
- Reaper's MIDI routing allows you to send MIDI from one track to multiple Cableguys plugins using the 'Send' functionality.


Image-Line FL Studio
- In ShaperBox 3, FilterShaper XL and MidiShaper, turn on MIDI Trigger mode by clicking the MIDI button below the Wave Editor or in MidiShaper’s Source A, B, C or D section. In Snapback, select the MIDI option in the Trigger panel. In PanCake, select a 'MIDI Triggered' or 'MIDI 1-Shot' triggering mode. In ShaperBox 2, set the 'MIDI Trigger' mode to 'On' or 'On (1-shot)'.
Note: If you are a Mac user, use the VST or VST3 version of the Cableguys plugin and not the AU version, as AU plugins cannot accept MIDI input.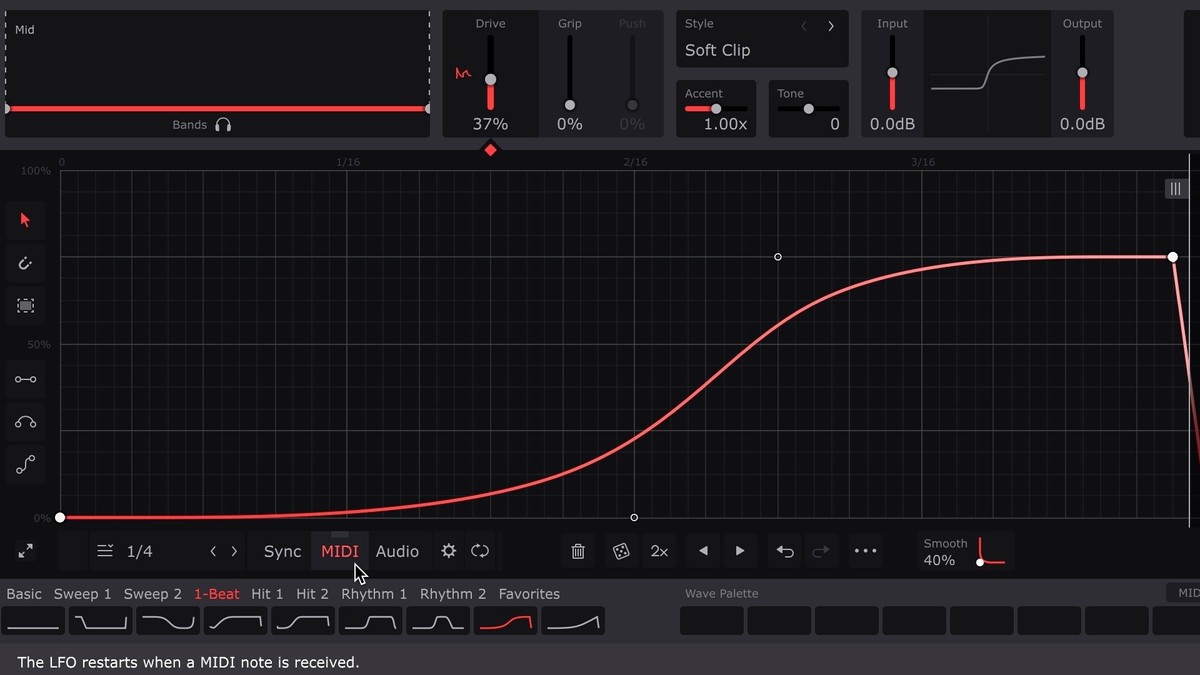
- Click the little cogwheel icon to the left of the plugin window header, then the 'plug and cogwheel' icon to access the advanced Settings.
In the MIDI section, set Input port to the MIDI port you want to use (for example, 1).
Click the cogwheel again to hide the Settings.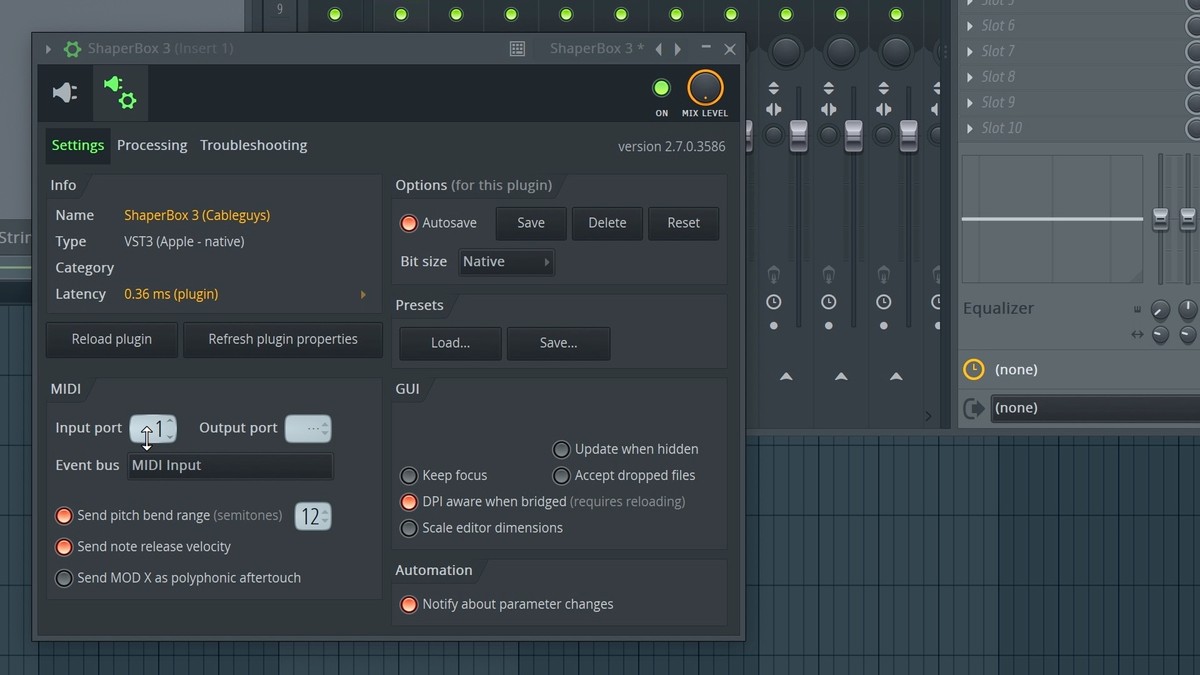
- Insert a MIDI Out plugin and set Port to the same port you selected in the previous step (for example, 1).
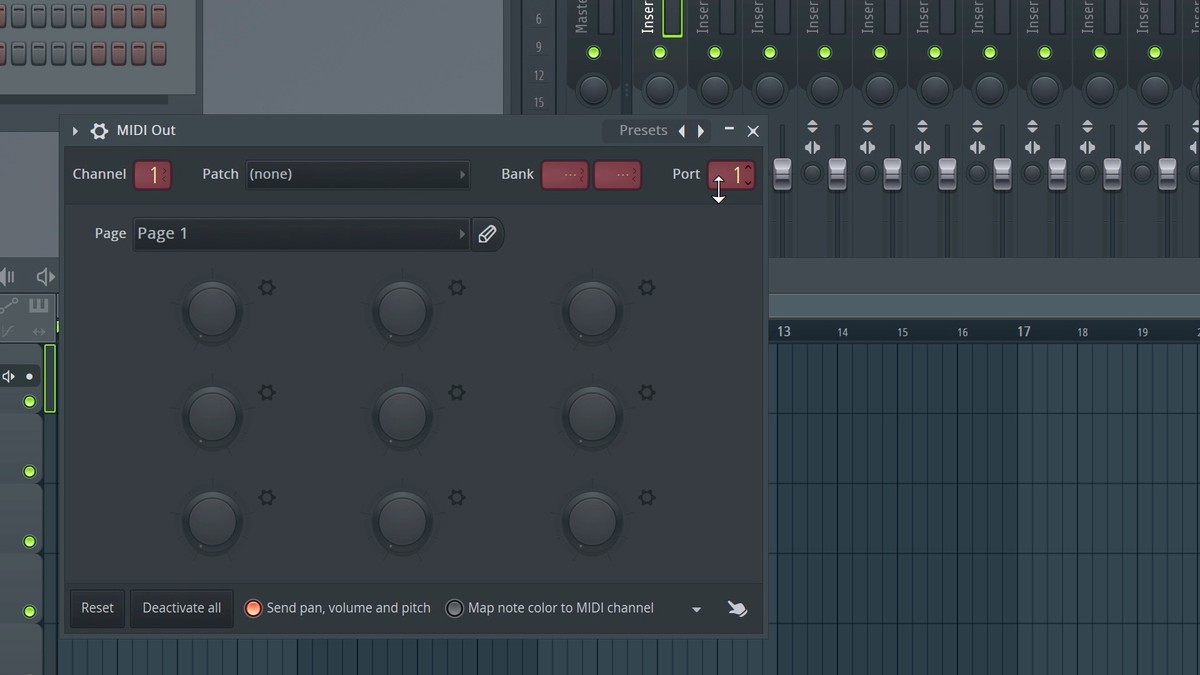
- Create a MIDI pattern for the MIDI Out plugin, and add MIDI notes in the rhythm that you want to trigger the Cableguys plugin.
Any note will work, except when ShaperBox's Wave-switching MIDI Trigger option is enabled, in which case only C notes will trigger the LFO.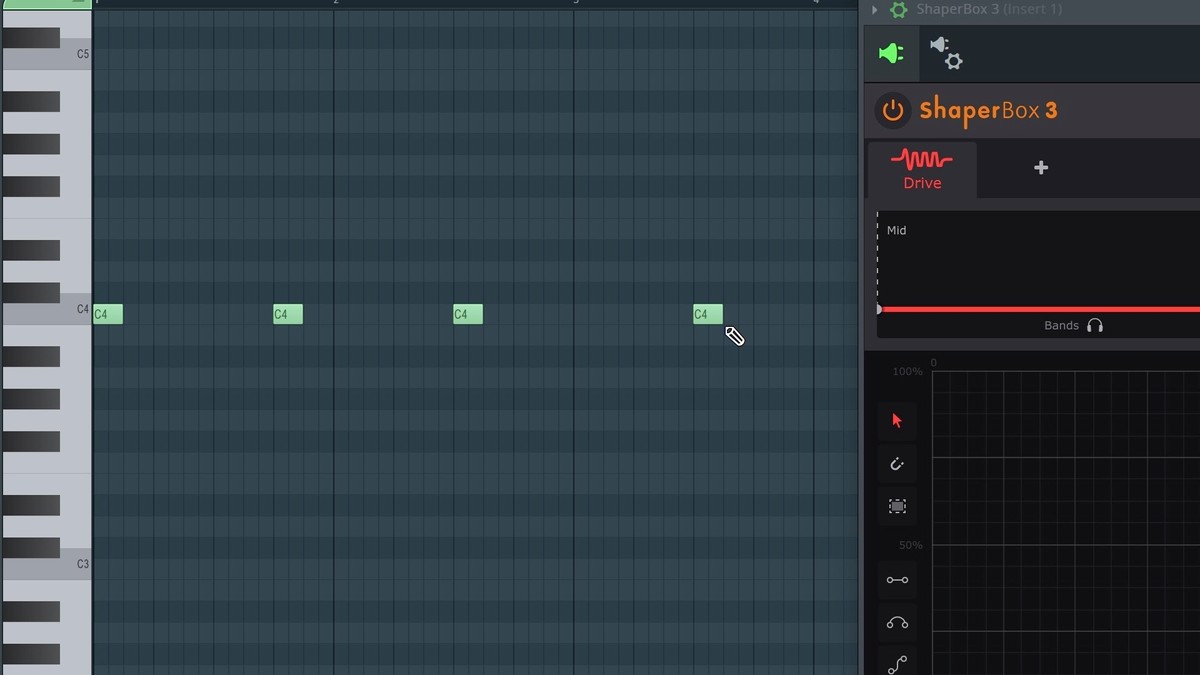


PreSonus Studio One
- In ShaperBox 3, FilterShaper XL and MidiShaper, turn on MIDI Trigger mode by clicking the MIDI button below the Wave Editor or in MidiShaper’s Source A, B, C or D section. In Snapback, select the MIDI option in the Trigger panel. In PanCake, select a 'MIDI Triggered' or 'MIDI 1-Shot' triggering mode. In ShaperBox 2, set the 'MIDI Trigger' mode to 'On' or 'On (1-shot)'.
Note: If you are a Mac user, use the VST or VST3 version of the Cableguys plugin and not the AU version, as AU plugins cannot accept MIDI input.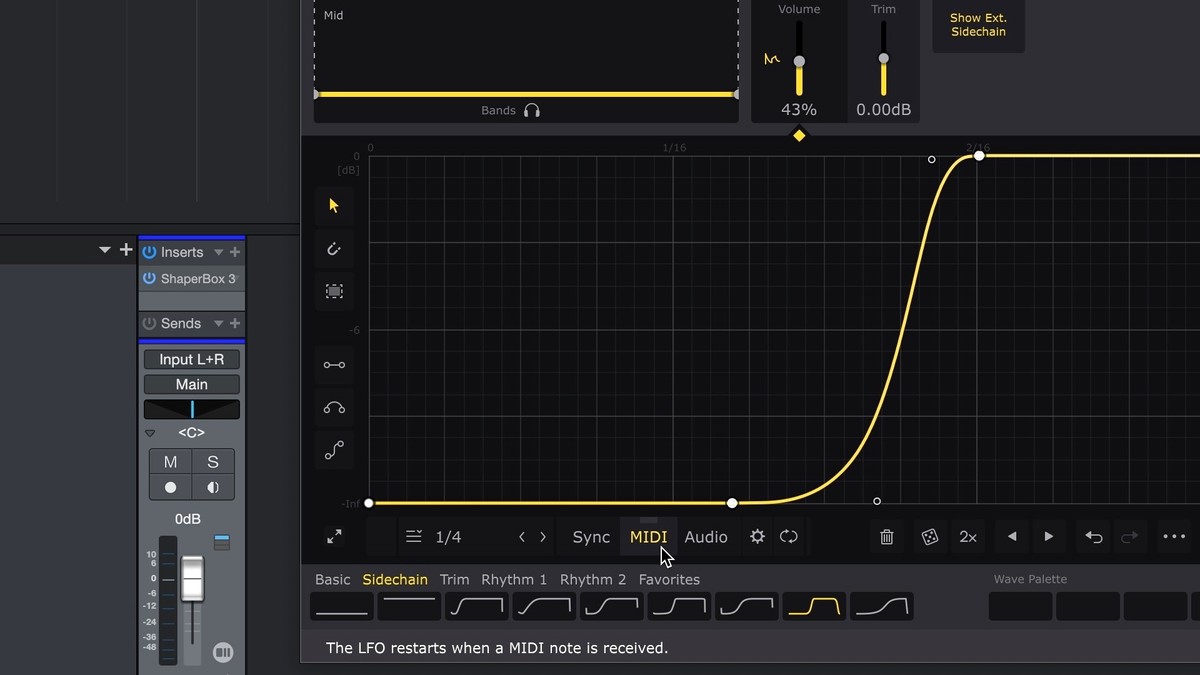
- Insert an Instrument track, and set its Output to the Cableguys plugin.
- On the Instrument track, create a MIDI clip, then disable Record and Monitor.
Add MIDI notes in the rhythm with which you want to trigger the Cableguys plugin. The Wave/LFO will be trigger from the start with each MIDI note.
Any note will work, except when ShaperBox's MIDI Switch option is enabled, in which case only C notes will retrigger the LFO Wave.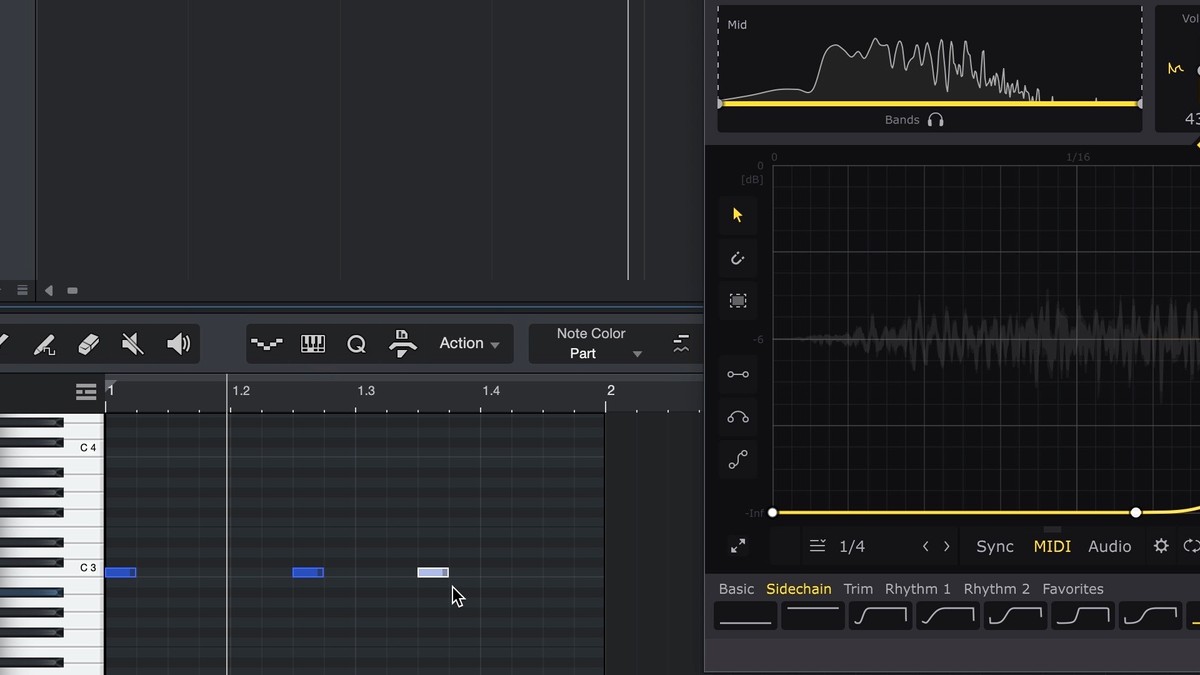


Propellerhead Reason
Please note that Reason's Export and Bounce options are unable to take MIDI triggering of audio effects into account, so you'll need to manually record your MIDI-triggered plugin tracks via your audio interface's loopback system or other method.
- In ShaperBox 3, FilterShaper XL and MidiShaper, turn on MIDI Trigger mode by clicking the MIDI button below the Wave Editor or in MidiShaper’s Source A, B, C or D section. In Snapback, select the MIDI option in the Trigger panel. In PanCake, select a 'MIDI Triggered' or 'MIDI 1-Shot' triggering mode. In ShaperBox 2, set the 'MIDI Trigger' mode to 'On' or 'On (1-shot)'.
Note: If you are a Mac user, use the VST or VST3 version of the Cableguys plugin and not the AU version, as AU plugins cannot accept MIDI input.
- Right-click the Cableguys plugin Device in the Rack and select 'Create Track for name of Cableguys plugin 1'. A Track will appear in the track list – right-click it and select 'New Note Lane'.
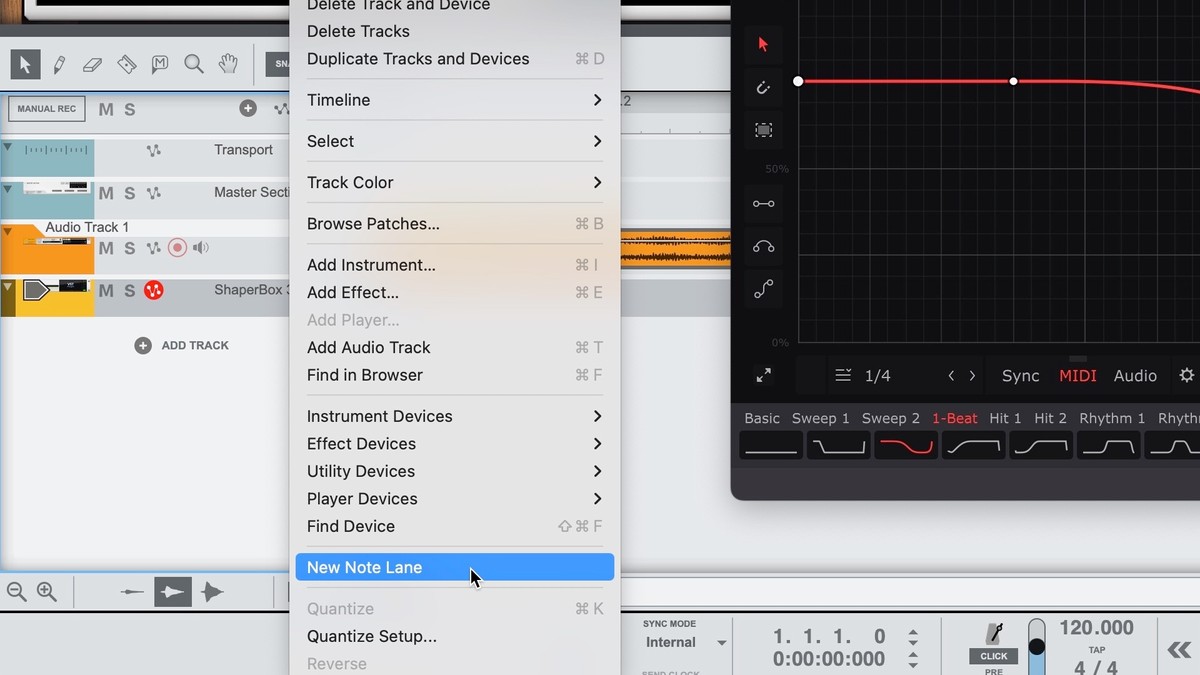
- On the Note Lane you just created, insert MIDI notes in the rhythm with which you want to trigger the Cableguys plugin.
Any note will work, except when ShaperBox's Wave-switching MIDI Trigger option is enabled, in which case only C notes will retrigger the LFO Wave.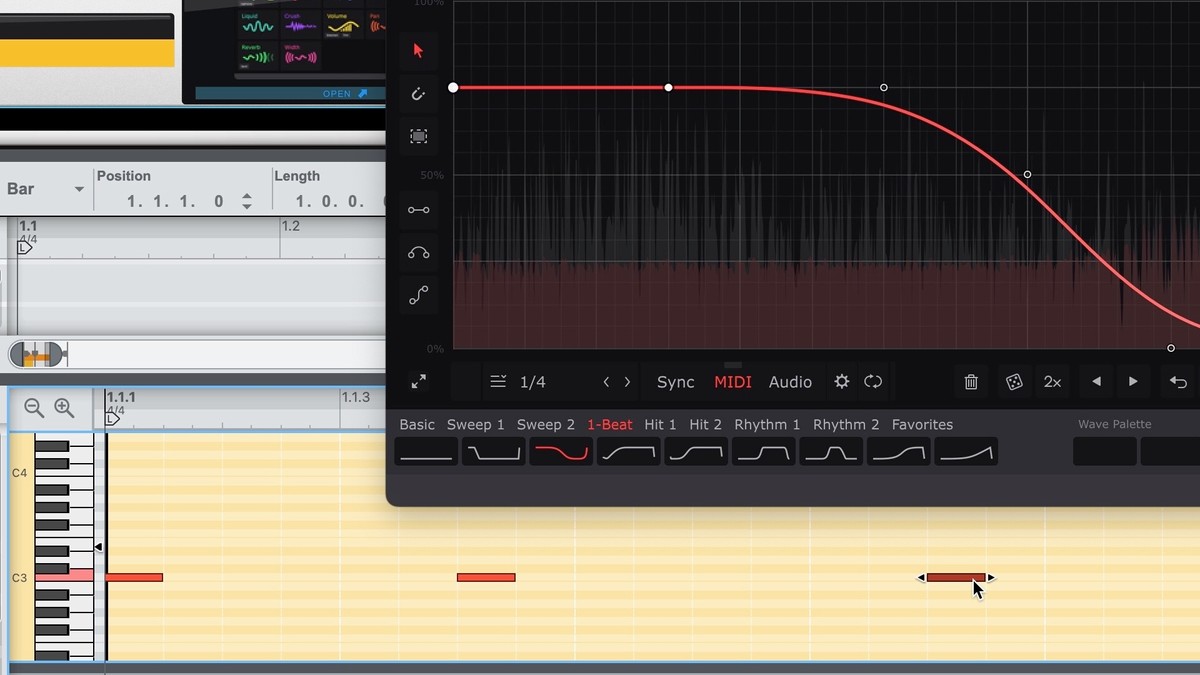


Steinberg Cubase
- In ShaperBox 3, FilterShaper XL and MidiShaper, turn on MIDI Trigger mode by clicking the MIDI button below the Wave Editor or in MidiShaper’s Source A, B, C or D section. In Snapback, select the MIDI option in the Trigger panel. In PanCake, select a 'MIDI Triggered' or 'MIDI 1-Shot' triggering mode. In ShaperBox 2, set the 'MIDI Trigger' mode to 'On' or 'On (1-shot)'.
Note: If you are a Mac user, use the VST or VST3 version of the Cableguys plugin and not the AU version, as AU plugins cannot accept MIDI input.
- Insert a MIDI Track, create a MIDI clip, then draw or record MIDI notes in the rhythm with which you want to trigger the Cableguys plugin.
Any note will work, except when ShaperBox's Wave-switching MIDI Trigger option is enabled, in which case only C notes will retrigger the LFO Wave.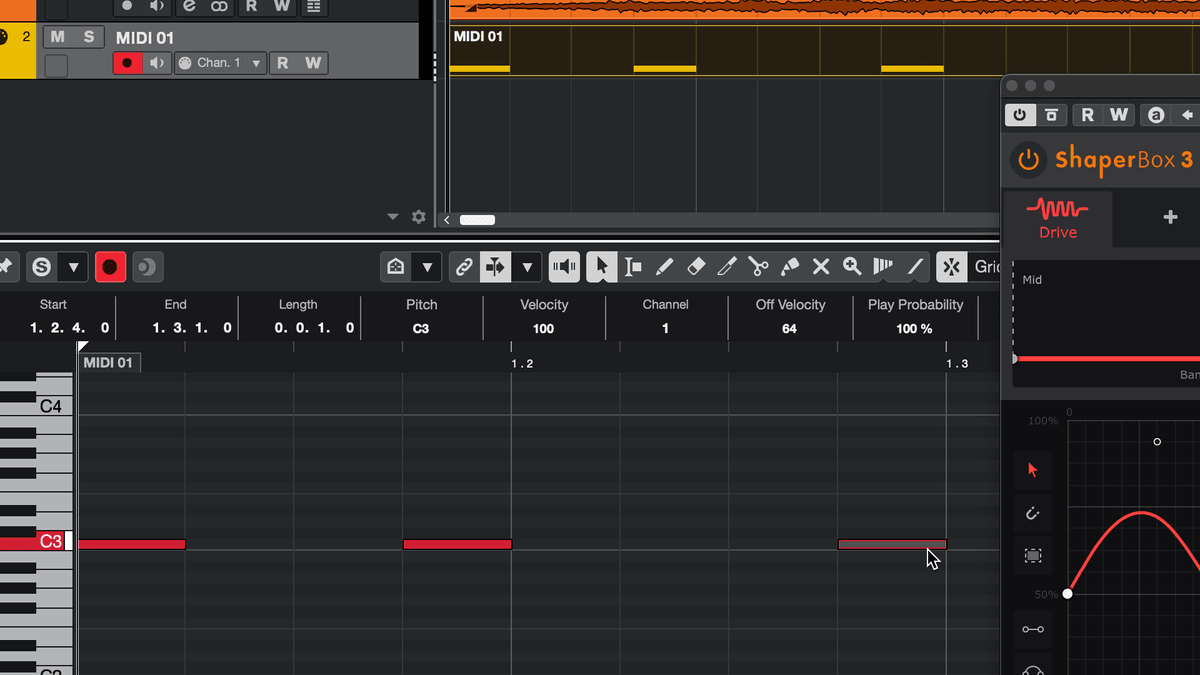
- On the MIDI track, set the Output to the Cableguys plugin.
Now the Wave/LFO will retrigger with each incoming MIDI note.


What are the benefits of using MIDI or audio triggering?
MIDI and audio triggering offer several advantages over position-synced LFOs:
- Precise Control: You can trigger effects exactly when you want them.
- Complex Rhythms: Create effects that follow complex, syncopated rhythms that wouldn't be possible with standard LFO timing.
- Real-Time Performance: Trigger effects in real-time during live performances or recording sessions.
- Multiple Plugin Control: Use a single MIDI track to trigger multiple Cableguys plugins simultaneously.
- Off-Grid Timing: Place MIDI notes anywhere on the timeline for effects that don't follow the grid.
- Workaround for DAW Timing Issues: Some DAWs, particularly Ableton Live, can provide inaccurate timing information to position-synced plugins due to flaws in the DAW's latency compensation. Using MIDI or audio triggering instead of DAW sync ensures accurate timing in all scenarios.