Support
Curve 2 Manual
We tried to make Curve 2 as simple to use as possible. A help view at Curve's bottom provides useful texts for its controls. Clicking on the Cableguys icon will show some more help on editing the waveform.
This guide helps you getting started and shows some of the non-obvious features.
User-friendly design
All the controls are available within a single window, in a clear, neatly-organized design that still looks good after many solid hours in the studio.
Exceptional sound quality
Curve computes the audio at a per-sample basis. Its LFOs are sample-accurate and will always stay in sync, even when you make tempo changes in your host software, or jump ahead to different parts of your track.
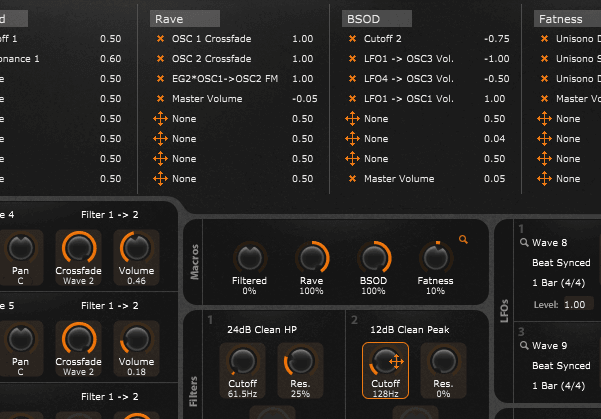
Macro controls, modwheel and aftertouch
You can explore vast sound variations quickly and let multiple parameters alter at once with Curve's macro knobs. Macro 1–3 are individually adjusted and differ for every preset, while most presets have macro 4 in common - the "Fatness" macro. Handy for quick thickening up of your sounds.

The first knob is hard-wired to modwheel, the second one to aftertouch.
You can easily create your own versatile macro assignments with our straight-forward drag'n'drop controls (accessible via the top right button in the macro area). Our preset designers are doing the same and expanding the best presets from the community for quick access to those parameters that define the core of a sound.
Unique waveform editing
Draw waveforms with ease and precision. Create smooth bezier curves, peaks, cuts and slopes using soft or hard breakpoints, producing gentle transitions or sharp bends in the waveform. As with all Cableguys plugins, Curve's waveform editing offers great flexibility and excels the automation functionality of most DAWs.
From precise control to fluid flow — all the details of wave editing with Cableguys plugins in under 4 minutes - this video covers it all:

How to edit a wave:
- To create a point, click on a free area.
- To delete a point, double-click on it.
- To move a point, click on it and drag the mouse.
- To temporarily enable/disable snapping, hold SHIFT while moving a point.
- To select multiple points at once, hold SHIFT and click and drag the mouse. You can then move and scale the selected points. Hold ALT to move points vertically only.
- To change the weight of a point, right-click on it.
- To directly create a hard point, CTRL-click on a free area.
Tip: You can also see most of the editing options from within the software when you click the Cableguys logo.
Additional editing functions
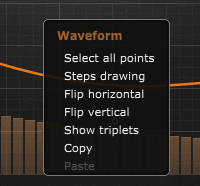
A right click on a free area in the waveform opens a menu with additional editing options which let you select all points (great to easily scale the intensity of the waveform), activate steps drawing, flip the waveform horizontal or vertical, show a triplets trip, or copy + paste the waveform.
A row of buttons below the waveform lets you delete selected points (or all points, if none are selected), activate steps drawing, activate snap-to-grid, activate a notes grid, choose from a selection of waveforms, randomize points (only existing points will be randomized), move the waveform left or right (shift-click for smaller steps), or undo + redo your edits.

Drawing melodies
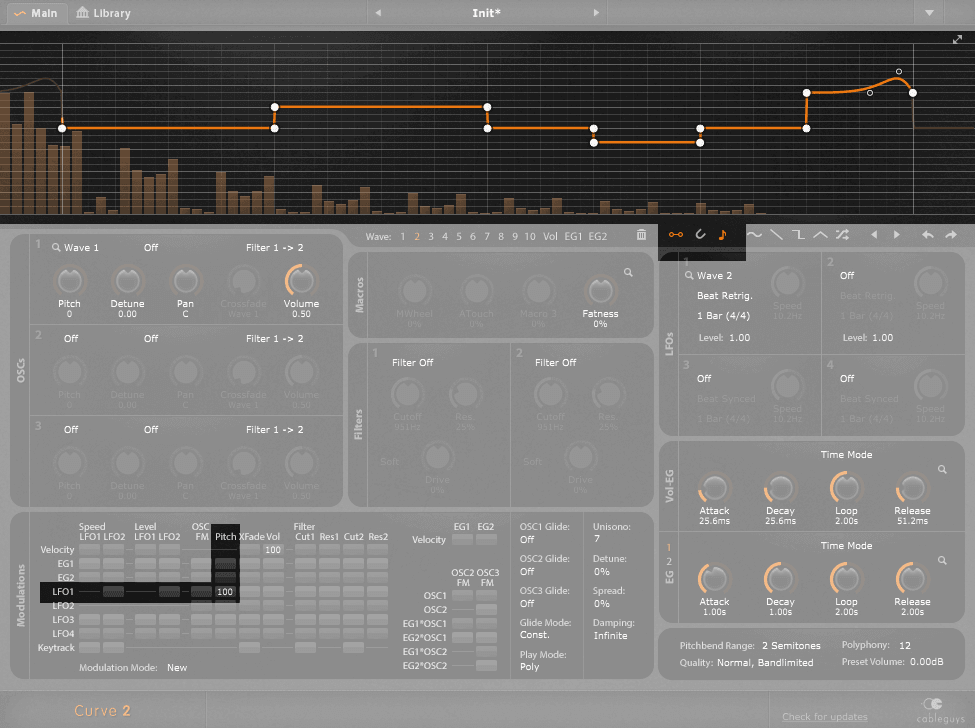
If you enable the notes icon below the waveform, you'll see a grid with lines, and the waveform points will snap to this grid. If you route the LFO to pitch with 100%, one line will correspond to exactly one semitone.
Additionally, you can enable the steps tool (that's the 2nd icon on the left of the notes icon), to draw notes more quickly. Use the arrow in the top-right corner of the wave window to show a larger waveform.
Then deactivate the notes tool, and you can draw slides.
For an example – a melody with a small slide at the end – see this screenshot:
Drawable envelopes
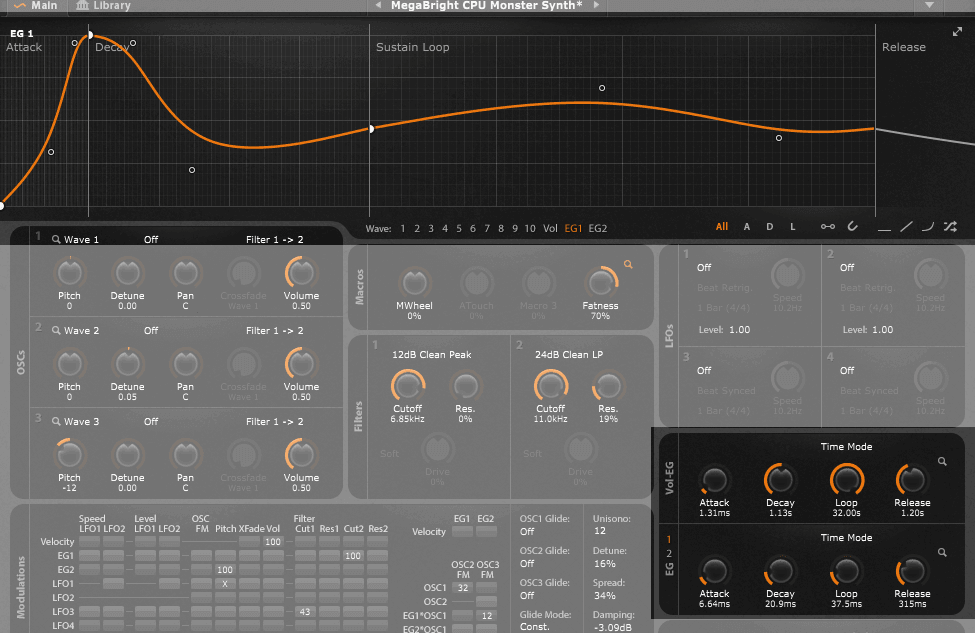
Curve 2 allows you to not only draw waveforms for its OSCs and LFOs, but also for its three envelopes. You can draw the envelopes you need for your analog curves, for rhythmic patterns, for whatever you can think of. Click on the magnifier in the EG sections for editing the envelope curves.
Curve 2's modulation matrix
We think that we made it especially easy to assign modulations in Curve. After all, that's when the real fun starts, when Curve's flexible, drawable LFOs and drawable envelopes add great depth to the sound. Listen to presets by Konrad, EdT and others for great examples.
To control individual OSCs, simply mouse-over a modulation cell. Three new controls will show up which allow you to assign individual modulations for OSC 1, 2 and 3.

An "X" is shown in a modulation cell if the OSCs' values differ.
Knobs
SHIFT-click on a knob or on a cell in the modulation matrix for precise adjustments, double-click on it for setting the default value.
LFOs
The LFOs can take you places. Set them free-running, synced to the beat of your sequencer or synced to the frequency of a note you're playing, from long, evolving LFO lengths right up to the audible range.
With the synced modes, the position of the LFO is always synced with the position of the DAW. If you're moving the play position in your DAW, the LFO will adjust its position accordingly.
With the 1-Shot modes, the LFO runs exactly once when Curve receives a MIDI note, and it will remain at the end value of the waveform (if the waveform ends at the bottom, the volume will stay there, if it ends at the top, the volume will be up).
With Pitch->Rate the LFO speed will be set to the frequency of the note that you play, so it can be used for ring modulation.
Note that Ableton Live has a massive bug concerning timing, and all position-synced plugins can suffer from this. For more info on that, see our Support article.
How to make a "correct" preset
Curve invites everyone to share their preset creations with others. A vital community and fresh sounds which are opposed to public voting make it not only interesting for everyone to use new sounds, but also for the creator to find out what ratings they can achieve with their sounds.
This tutorial will help you in making your presets playable, to make sure they are in tune, and that all presets share a common volume level. Make sure that your presets satisfy quality needs, and you can take an important step to getting highest votes.
Correct volume
It's useful if all presets share a common volume level. Our tip is this: First, set the volume slider of your DAW to 0dB. Then adjust Curve's "Preset Volume" setting so that your DAW shows a volume between -3dB and 0dB while playing one note at a time at a high velocity (or by playing a chord of 3 notes, if your sound is especially made for chord sounds).
Correct pitch
Please make sure your sound is in tune. If it's not a drum or FX sound, this is vital, so that your sounds play in tune with the rest of the song:
- At least one of the three OSCs that you can use should serve as the main oscillator, with having pitch set to 0, or to a multiple of 12 semitones.
- "Detune" can come in handy for creating fat patches by detuning one OSC opposite to another one. If you do this, it is for example good to set one OSC to "-8" and another one to "+8". Setting one to "0" and the other one to "+16" would detune the resulting sound.
- If you modulate pitch with an envelope (EG 1 or EG 2), the pitch will be changed unless sustain is set to 0.
- If you modulate pitch via an LFO please make sure that the sound does not get out of tune.
Make use of velocity, modwheel and aftertouch
The standard behavior is routing velocity to volume. To gain more depth, it's also useful if you set up velocity to influence filter cutoff and other parameters. To add more fun, it's good if you make use of modwheel and aftertouch (via the first and second macro control) as well.
You might set up modwheel and aftertouch to alter LFO speed for vibrato effects or Dubstep-esque basses, or to alter resonance for screaming sounds, etc.
Make use of keytrack
By default, the filter's cutoff frequency is static, but for some sounds it might be better if the cutoff frequency changes according to the note that you play. That's where keytrack comes in. If you set keytrack to 100, the cutoff frequency is doubled for every octave above C3, and halved by every octave below C3.
Library
The library ships with a selection of useful presets. You can save your own and they will be stored locally on your computer. If you want to, you can sync them to backup them on the Cableguys server, and you can keep them private or share them with others - but it's up to you, there's no need to ever connect Curve to the Internet if you don't want to.
To sync with the server, choose "Sync" from the menu at the right upper corner of the plugin window, and you will also get all the new presets that other users or our preset designers have been working on.
Syncing 1000+ presets can take a few minutes, but runs smoothly in the background.
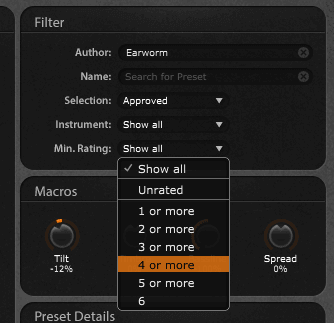
Curve's preset browser has several filter settings to filter for a certain instrument, a minimum rating (by your rating or by the average rating of the community), by preset name and author. Also, per default, Curve only shows presets that are approved by Cableguys. Those share a common volume level, good playability and can get you started right away. You can change the filter to show all presets, and browse unverified presets for hidden pearls.
The "Details" area in Curve's Preset Library shows you more information about the author, rating, tagging and upload date of a preset. Pluginguru for example provided a short text and links to his website, SoundCloud, Twitter and Facebook page. Clicking on one of the icons lets you browse his pages.
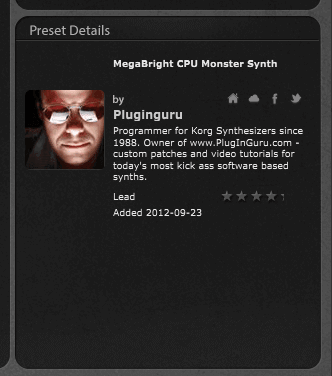
As soon as you've shared your first preset, you can click "Edit author profiles" from the top-right menu in the Preset Library to add your own teaser text and web links.
Parameter automation
From LFO speed to waveform selection, absolutely everything can be automated. You can even automate the shapes of the waveforms and breakpoint movements for dynamic effects.

